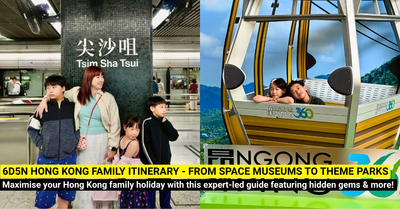


Discover a 13-day kids-friendly Japan itinerary featuring the magic of Tokyo Disneyland, the powdery slopes of Rusutsu, and the vibrant, Pokémon-filled streets of Tokyo.

Planning a family trip to Japan? Here’s a 13-day itinerary based on a family adventure in December 2025. This trip perfectly balances the high-energy excitement of Tokyo with a serene, snowy escape to Hokkaido, specifically curated for families with older kids (ages 9–12).
Summary
- Day 1: Arrive at Narita - Check into Tokyo Disneyland Hotel and explore the area.
- Day 2-3: Full days at Disneyland and DisneySea - Transfer to ART Narita Hotel on Day 3 for a strategic early flight.
- Day 4: Fly to Hokkaido (New Chitose Airport) - Direct shuttle to Rusutsu Resort.
- Day 5–8: Skiing and snow fun at Rusutsu Resort.
- Day 9: Return to Tokyo - Check into HIZ Ginza and explore Ginza and Marunouchi.
- Day 10: Sensory wonders at teamLab Planets, money-washing at Koami Shrine, and Akihabara electronics.
- Day 11: Pokémon GO in Shinjuku, Pokémon Center Mega Tokyo, and Shibuya Scramble.
- Day 12: Samoyed Cafe, shopping at Omotesando, and a memorable Shabu-shabu lunch.
-
Day 13: Last-minute packing and departure from Narita.
Arrival in Tokyo - Narita Airport

We took the red-eye flight via ZipAir to Tokyo, arriving at Narita Airport at around 8.30 am (local time). From here, we headed straight to the Tokyo Disneyland Hotel via the Narita Airport Bus (some website calls it the Airport Limousine Bus). The journey took about 80 - 90 mins.
You can easily find the bus ticket counters with the large sign that says Bus Tickets and also the yellow background sign that says Narita Airport Bus. Tickets can be purchased from the ticketing machine and is priced at 2,900 yen for adults and 1,450 yen for children.
Day 1–3: The Disney Kickoff


Tokyo Disneyland Hotel is like our "splurge" stay (approx. SGD $600+ per night), but for Disney fans, the proximity is unbeatable plus you get early access (15mins to Disneyland only) which will give you time to purchase your Disney Premiere Access and grab those free priority passes.
We booked our hotel directly from Disney's website while tickets to Disneyland and DisneySea were purchased from Klook. Make sure to book your hotel early (especially for the ones with DisneySea access, we hear they sell out 3 months in advance) and theme park tickets are only available 2 months in advance.
Do note that only Tokyo DisneySea Hotel MiraCosta, Disney Ambassador Hotel, and Fantasy Springs Hotel offer early access to DisneySea and Disneyland, the other Disney hotels (including Tokyo Disneyland Hotel) offer early access to Disneyland only.
If you read our 8-days Shanghai itinerary, we were not too impressed by Shanghai Disneyland Hotel but Tokyo Disneyland Hotel gave better vibes the moment we stepped in. I believe the high ceilings and chandeliers played a huge part!
Day 1: Ikspiari

We spent the first day exploring Ikspiari, a shopping mall at the Disneyland area. There are lots of food options, so you can grab lunch and dinner here. There's also a supermarket where you can purchase snacks and breakfast for the next day.

You will need to take the Disney Resort Line to travel between places. We recommend you purchase the Disneyland Resort Line day passes that allows unlimited trips. These come in 1-day, 2-day or even 3-day passes, plus you get to keep the tickets as souvenirs too!

TIP: each ticketing machine offers a different ticket design. Purchase from different machines to collect the designs! Watch our video for more details!
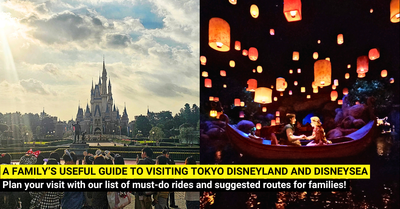
Day 2: Tokyo DisneySea

Tokyo DisneySea is often called the most beautiful theme park in the world, and for kids aged 9–12, the experience is unrivaled.


We headed straight for the newly opened Fantasy Springs to ride the Rapunzel's Lantern Festival, a popular boat ride and Anna and Elsa’s Frozen Journey, which features some of the most advanced animatronics ever created. Other high-priority rides include the competitive Toy Story Mania!, the terrifying Tower of Terror, and the flagship attraction is Journey to the Center of the Earth, a high-speed subterranean thriller located inside the park’s iconic volcano.

Don't miss the nighttime spectacular Believe! Sea of Dreams, a massive show on the harbor featuring projections on the DisneySea Hotel MiraCosta and stunning water effects.


Head back to Toy Story Land at night, and you will be greeted by a very different sight. Even if you do not plan to take another ride, the decoration is great for a last family photo!
Quick Tips for Your DisneySea Day:

- We recommend starting your day at Fantasy Spring. Simply head right from the entrance. If you end up at Toy Story Land (which we did), don't turn back towards Fantasy Spring since you will be late in the queue. Just go for Toy Story Mania!, also a popular ride. Instead, because we made the detour, we got stuck in a 90mins queue at Rapunzel's Lantern Festival as our first ride.
- The Disney Premier Access (DPA), a paid service where you pre-book a time slot for popular rides, is a great way to make sure you skip the queue and make the most of your trip!
- Don't miss the unique snacks, grab the unique flavoured popcorn around the park, the Gyoza Sausage Bun in Mysterious Island or the Green Alien Mochi near the American Waterfront!
Make sure to read our dedicated Disneyland and DisneySea review for more tips and our ride strategies. We summarise some key tips here!
- Arrive at the park gates at least 60 - 90 minutes before opening. Gates opened 15 mins before opening. We suggest bringing your breakfast along and eating while you wait in the queue.
- Make sure to download the Tokyo Disney Resort App before your visit and to scan all your tickets within the app before your visit. The app will help you manage your entry, tickets and DPAs.
- Queues for food can be quite long - but the advance order (also on the app) is really useful! Order first, and choose a time to pick up your food.
Day 3: Disneyland

We spent the next day at Tokyo Disneyland. Since we stayed at the Tokyo Disneyland hotel, we enjoyed the 15 mins early entry. The day still started early as we checked out and joined the priority queue at 7.30 am (again with our breakfast in hand) and there was already a long queue in front of us.


Once the gates opened, we made a beeline for the must-ride highlight, the Enchanted Tale of Beauty and the Beast, located inside a stunning pink castle; it uses a trackless system and incredible animatronics to pull you right into the movie’s ballroom. Highly recommended!
The Pooh’s Hunny Hunt is another trackless masterpiece that is world-famous for its "bouncing" honey pots, while The Happy Ride with Baymax is a high-energy dance party on wheels that is guaranteed to get everyone smiling. Both may seem like "just like that" but I guarantee that you and the kids will enjoy both ride thoroughly!

For your must-see, the Tokyo Disneyland Electrical Parade Dreamlights is a nighttime spectacle that far surpasses other Disney light parades with its sheer scale and detail.
You may have noticed that we did not mentioned the fireworks. Unlike other Disney Lands, the fireworks at Tokyo is not a focus and you might want to skip it for an extra ride instead.
Quick Tips for Your Disneyland Day:


- Plan your Disney Premier Access: We only used one Disney Premier Access (DPA), this can either be for Beauty & the Beast or The Happy Ride with Bay, both often have waits up to 120 mins! But since we cleared Beauty & the Beast in the morning, we used our DPA for Baymax instead.
- The "Stick" Secret: If your kids love Stitch, head to Stitch Encounter in Tomorrowland—it’s an interactive show where Stitch actually talks to and jokes with the audience (note: the dialogue is in Japanese, but the humor is quite universal!)
Moving to Art Narita Hotel

We left Disneyland at about 9 pm and since we had an early morning flight on Day 4, we moved to ART Narita Hotel (approx. SGD $60/night) that offered a free 15-min shuttle bus to Narita Airport. The hotel is a simple budget hotel, clean and efficient, and super convenient for those heading to Narita Airport. We also read that they serve good breakfast, but our flight was too early for it.
Because we left Disney late, there wasn't an easy way to get there. Instead, we took a Jumbo Taxi which cost about ¥26,000 (approx. SGD $235). We got the hotel concierge to book this for us on the day of our arrival, and recommend doing so especially if you have heavy luggage.
Day 4–8: Hokkaido Snow & Skiing
We flew from Narita to New Chitose (CTS) on Peach Aviation (approx. SGD $600 for 4 pax). It's a no-frills budget flight (1.5 hours), so prep your own entertainment.

We stayed at Rusutsu Resort, a ski-in/ski-out destination. From CTS, we took the Hokkaido Resort Liner, which was easy to book online. The 2-hour bus ride is comfortable with one stop, and the kids will love catching their first glimpse of the Hokkaido powder snow.
Rusutsu Resort Adventures


For those who booked rooms with ski passes, you won't receive them for the check-in day but only from the next day. We spent the 1st day playing in the snow and exploring the resort. Little ones can also play at the Kids Snow Park where they can play on snow tubes, skis and other snow play items.


The Kids Snow Park is priced at ¥1,400 before the ski escalators are installed. Since we did not stay until the escalators are installed, we are not sure what the price or experience is like with it.
Families can also make use of 3 onsens at Rusutsu. 2 are in the resort and the other is at the Westin (you can take a free 5-min tram ride there). We recommend using the onsen on Level 6 of the resort or heading over to Westin as the facilities were more modern and it came with an outdoor onsen where you can soak yourselves in the warm water while snowflakes fall from the skies. Do note that onsens are open in the morning, closed for the afternoon, and open again in the late afternoon.


Dinner options within the resort was limited and we headed out to a nearby Izakaya, Tanpopo Shokud, twice during our trip. We recommend visiting them for the nice cosy atmosphere and friendly staff!
Information for First-time Skiers

-
Skiing Lessons: If it’s your first time, definitely get an instructor. Do not attempt the slopes alone thinking they look easy! We took a 5-hour package (broken into 2 sessions with lunch in between) for the family at about ¥83,000
-
Book Your Instructor Early: Head to the International Ski School Desk (its a small room next to Pub Cricket). As you cannot book the international instructors online and there are limited international instructors, we were told that some people queue at the ski school as early as 7 am to secure a same-day slot. We arrived at 12 pm and could only book for the following day.
-
Gear Rental: The resort’s online rental system is efficient. You fill in an online form and show it to the counter. Gloves and goggles are yours to keep while other gear needs to be returned. Because of the way the rental packages are set-up, you may still need to purchase goggles and gloves even if you have your own. You can refer here for more details. Our rental for 4 pax came up to ¥78,000 for a day.
-
2 or 3 Days Rental: Before we did our first session, we thought we could ski the whole day for 3 days. Instead, we do suggest renting the gear for 2 days (or even just 1 day) first, and to top-up for 1 more day later (although it is more expensive compared to renting for 3 days straight). Just in case, you decided 2 days is enough.
- Use the Room Lockers: At Rusutsu Resort, each hotel guest will have a locker at the ski rental area. The locker number is the same as your room number, and you can access it using your room key card. Use it to store your gear, so you don't have to carry it around.
Arriving Before the Slopes are Open

As we arrived at Rusutsu Resort before the slopes were opened (they only opened on the 3rd day of our arrival) due to later than expect snowfall, we were offered (1) to take a 2-hour bus ride to another resort, Kokusai where the slopes are already open or (2) to receive ¥2,000 in dining credits.
We chose to go to Kokusai, but that meant an additional 4 hours of traveling time and additional cost as we had to rent ski gears at both locations for different days. The slopes at Kokusai was also much steeper and we will not recommend beginners to attempt them.
On hindsight, we would still have chosen to go to Kokusai, but perhaps we will have stayed at the bottom of the slopes and just enjoyed our time there.
Leaving Rusutsu Resort
Your access to the onsen and facilities will be terminated at check-out so you cannot do a last min onsen after check-out. However, your ski pass will still work for the day of check-out. You can also request for a storage locker (not the same as the ski gear locker) to store your luggage. This is free, simply request for a token from the concierge and each locker can fit at least one big luggage.
We took the Hokkaido Resort Liner back to CTS where we caught our flight to Narita.
Day 8–13: Tokyo City & Pokemon Paradise


We returned to Narita at about 9 pm and checked into HIZ Ginza. This was one of the few hotels that allows 4 people in a single room comfortably, saving us the cost of two separate rooms.
Logistics Tip: To get to HIZ Ginza from the airport, take the Narita Sky Access to the Asakusa Line and alight at Takaracho Station.
-
IMPORTANT: If you have heavy luggage, use Exits 7 or 8 (the ones with lifts). Google Maps may suggest an exit nearer to the hotel but do take note. Also, if you are planning to head to the airport, do note that Exits 7 and 8 do not have ticket machines, so buy your tickets at another entrance first.
Day 9: Tsukiji Outer Market and Ginza

-
Tsukiji Outer Market: We walked over to the popular morning market and to grab breakfast. It's really a touristy thing to do and prices are much higher compared to elsewhere.

-
Ginza: The rest of the day was spent exploring and shopping around the Ginza area as it was near the hotel. Don't miss the 12-story flagship UNIQLO shop too!

- Marunouchi Christmas Lights: Since we visited near the Christmas period, we headed over to the illuminations along Marunouchi. With the nice cooling weather, it was a great way to soak in the festive vibes.
Day 10: teamLab & Akihabara


-
teamLab Planets: Highly recommended! Suggest booking the earliest slot and arriving early to be in the first batch. It results in fewer crowds and much better photos. You will also want to wear pants that can be rolled up as you will be walking in shin-level water.

-
Koami Shrine: A small but famous shrine where you can "wash" your money in a ritual for good fortune.

-
Akihabara: A paradise for electronics and Pokemon Card collectors and those looking to purchase electronics. You can spend hours just viewing rare cards in the display cases and shopping for ear pods, phone accessories, etc.
Day 11: The Ultimate Pokemon Day

-
Shinjuku: While half the family went shopping, the other half went to the Shinjuku Station's West Exit near Yodobashi Camera where it is known as a "Pokemon GO" hotspot. There are lots of gym and chances for rare spawns.

-
Pokemon Center Mega Tokyo (Ikebukuro): Located in Sunshine City, this is a massive hub for exclusive merchandise and there are lots of meal options at the mall too.

-
Shibuya: In the evening, we visited the MEGA Don Quijote and also took several pictures at the classic Scramble Crossing.
Day 12: Omotesando & Best Meals


-
Samoyed Cafe (Takeshita Street): A quirky street with lots of animal cafes. We visited a cute dog cafe with fluffy white dogs. While the experience was fun, the dogs were playful and staff friendly, but it is quite pricey at about $30SGD per pax.
-
Omotesando (shopping): we walked through the streets of Omotesando, and managed to grab shoes from Onitsuka Tiger too. The outlet at Ginza was really packed, but this was bigger and less hectic.

- Shabushabu Yamawarau (山笑ふ): Located in Omotesando, this was our best meal of the trip. Each person gets an individual pot with high-quality beef. Highly recommended!
Day 13: Bye Bye Japan

We had a 4.30 pm flight from Narita back to Changi Airport. We had an early quick lunch and left for Narita (from Takaracho Station) at 12.30 pm, setting aside sufficient time for the usual airport checks.
If you are on ZipAir (like us), remember as a budget airline, everything is an add-on. Our add-on luggage was 30kg per person and it came with food as well as a airline amenities pack (blanket, neck pillow, eye mask and ear plugs). You may want to arrive earlier to make sure you are within weight limits and to give time for repacking if necessary. You may wish to purchase a mini Luggage Weighing Scale so you can check before leaving the hotel. We had one similar to this.
Tips for Visiting Japan
-
Connectivity: We used an eSIM from Shopee. It worked flawlessly allowing us to stay connected and using Google Maps.
-
Google Maps is King: Google Maps was really useful for our trip. We could keep track of train schedules, check direction and even make sure we use the right exits. .
-
Bring Your Physical Credit Card: While credit cards are widely accepted, many places actually required us to physically insert the cards into the payment machines. Contactless payment is not as common as in Singapore.
This 13-day journey blends the high-octane fun of Disney with the unique thrill of Hokkaido's slopes and Tokyo's modern culture. It’s a trip your kids will remember for a lifetime!